Technical characteristics of the Kitfort KT-304 bread machine
- Power 550 W
- Control type electronic
- Automatic programs 15 pcs
- Case material stainless steel
- Baking dish capacity 2.9 L
- Baking dish coating non-stick
- Baking weight 500/750/1000 g
- Delayed start up to 14 hours
- Power cord length 1 m
- Device size 350 x 247 x 300 mm
- Unit weight 4.9 kg

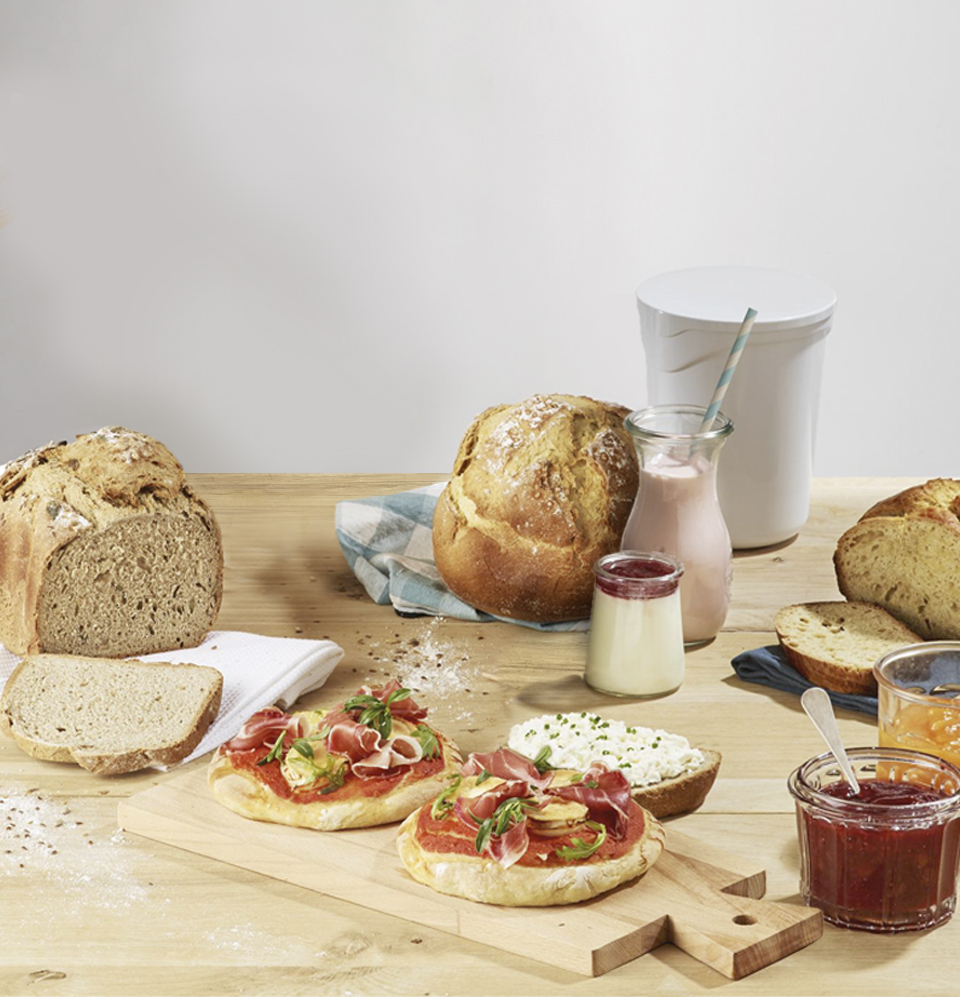
Fresh pastries and homemade desserts
There is nothing tastier than homemade bread. And you can be convinced of this! The KT-304 bread machine allows you to cook various types of bread, jams, desserts, yoghurts, as well as various types of dough. Load the ingredients, select the program - the device will do the rest!
Progressive features
With 15 automatic programs, you can easily prepare delicious homemade cakes, breads, muffins, yoghurt, jams or desserts. You can start cooking later using the delayed start function or use the quick bake program.

Always fresh hot bread on your table!
The bread maker is equipped with the function of choosing the weight of the finished product and the color of the crust in accordance with your taste preferences. The keep food warm function keeps baked goods fresh and hot for one hour after finishing.

Your favorite supplements
An automatic dispenser is installed in the lid for adding additional ingredients to baked goods during cooking without your participation! Sesame seeds, nuts, herbs, raisins, candied fruits - everything and even more for your taste.
Smart device
The bread maker has a non-volatile memory. If the power supply is turned off during operation, the settings are saved in the device memory for 10 minutes. When the power supply is restored, the program will continue automatically.
Everything you need
The set includes everything you need to start creating homemade cakes or desserts: a measuring cup and measuring spoon, a hook for removing a spatula, as well as recipes - from classic to gluten-free bread.
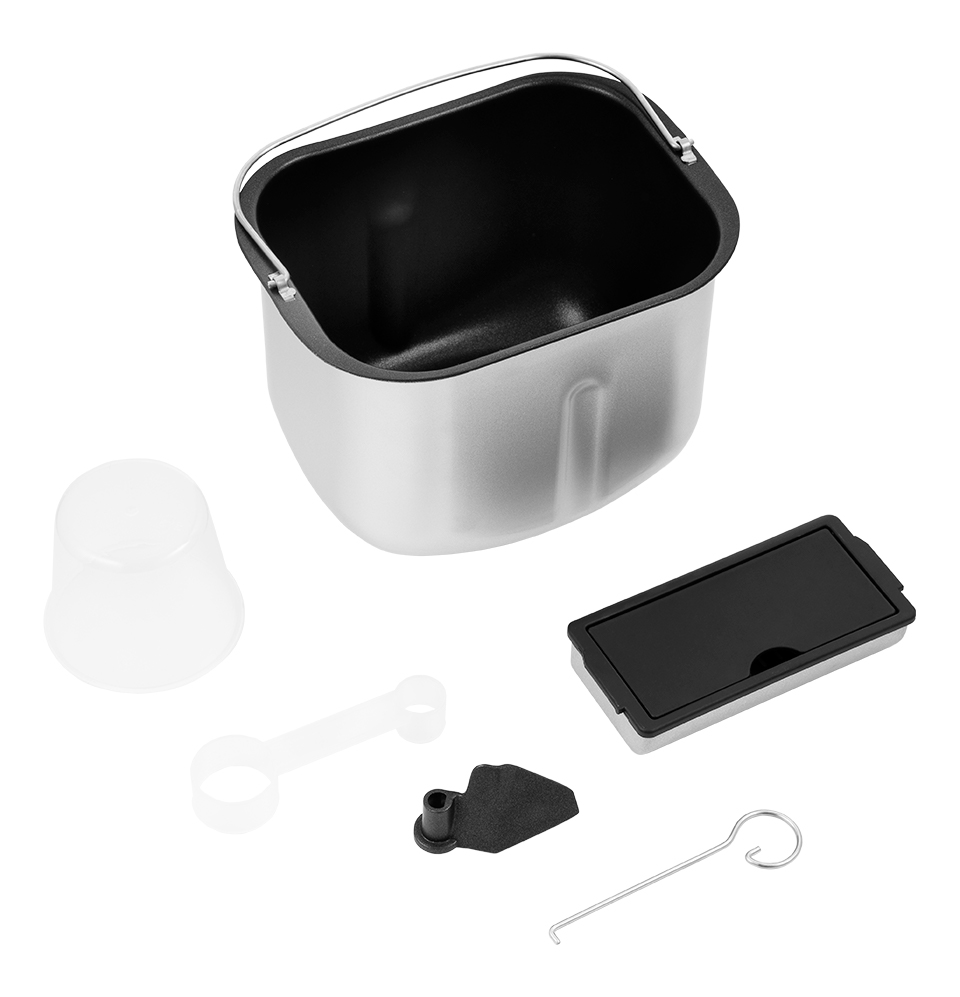
Kitfort KT-304 bread maker complete set
- Bread maker - 1 pc.
• baking dish with non-stick coating - 1 pc.
• mixing paddle - 1 pc.
• dispenser - 1 pc. - Measuring cup - 1 pc.
- Measuring spoon - 1 pc.
- Shovel extraction hook - 1 pc.
- Operation manual - 1 pc.
- Warranty card - 1 pc.
- Collectible magnet - 1 pc. (optional)
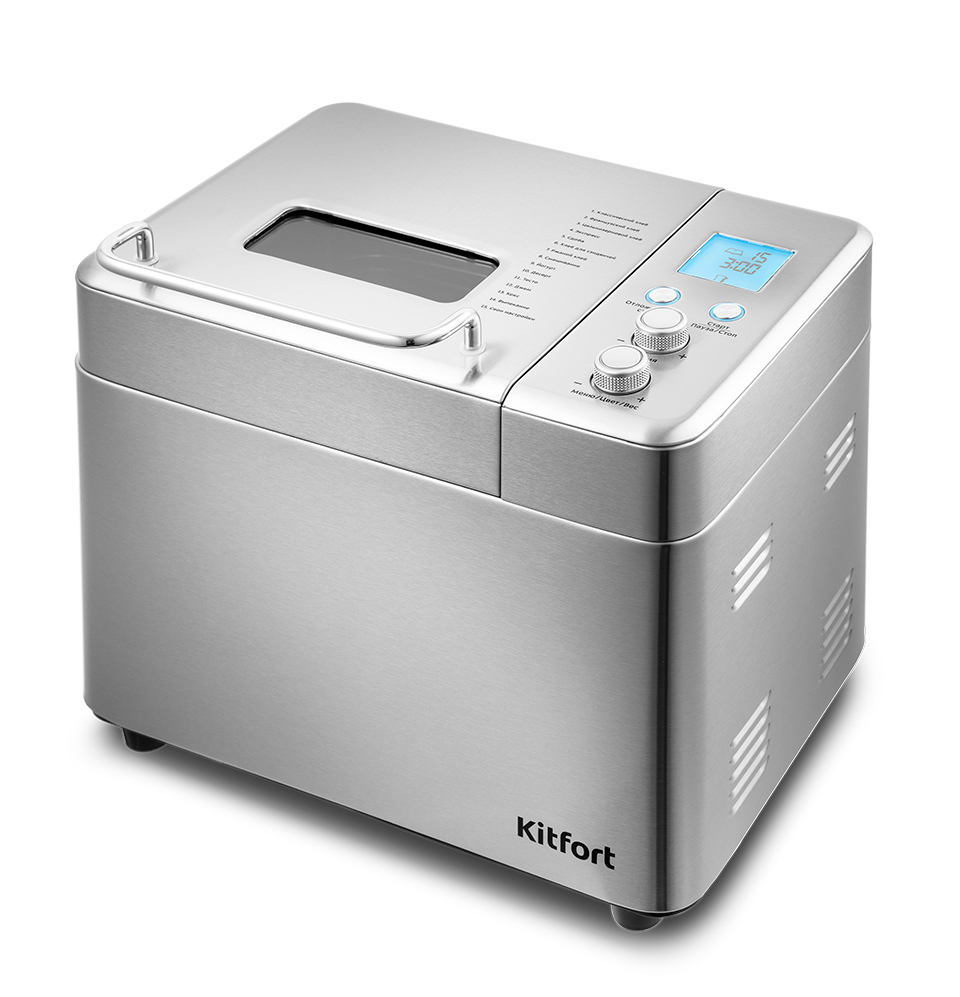
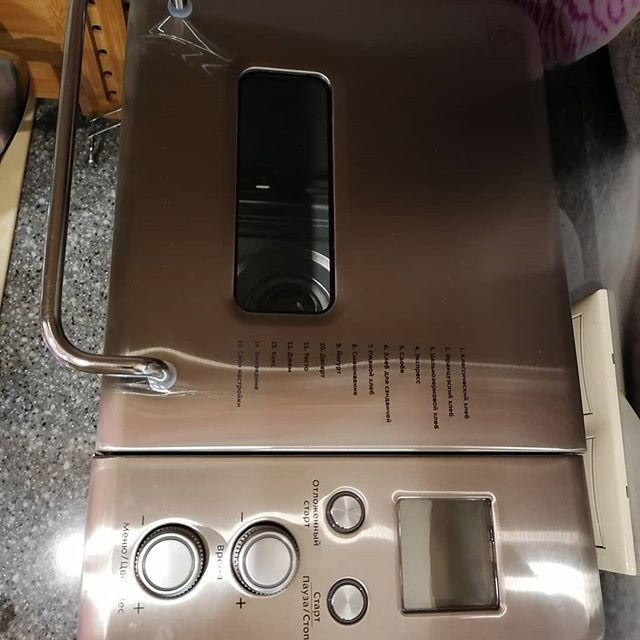
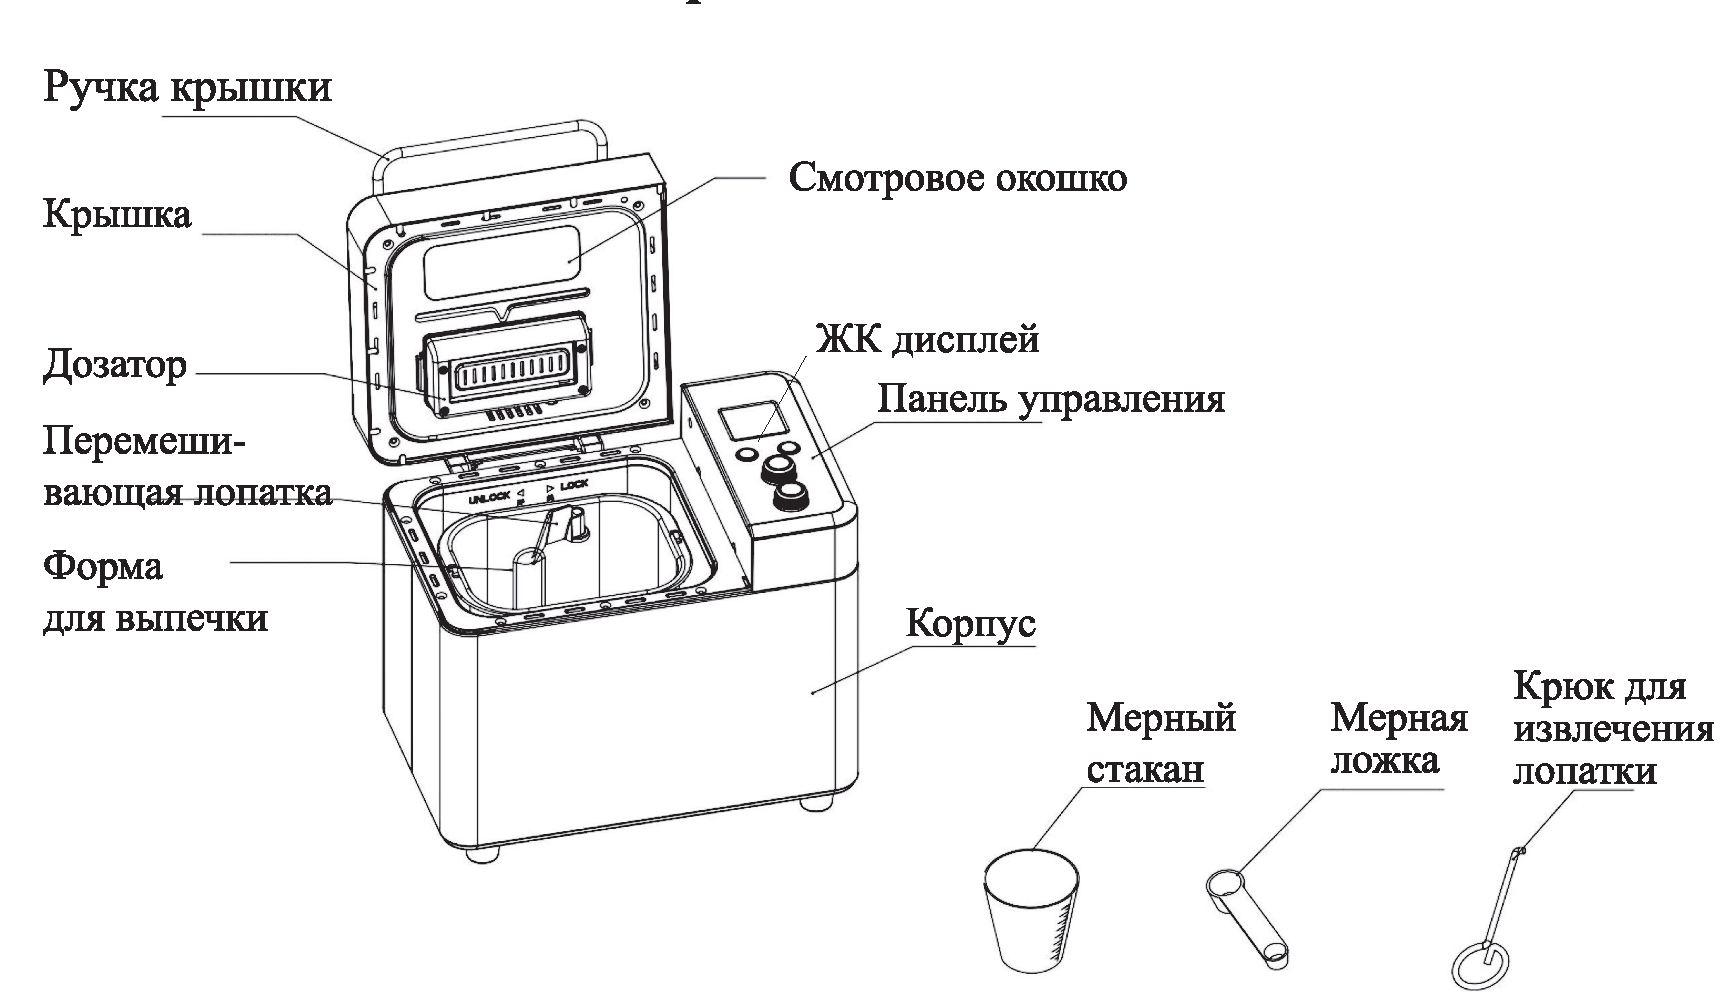
Breadmaker device Kitfort KT-304
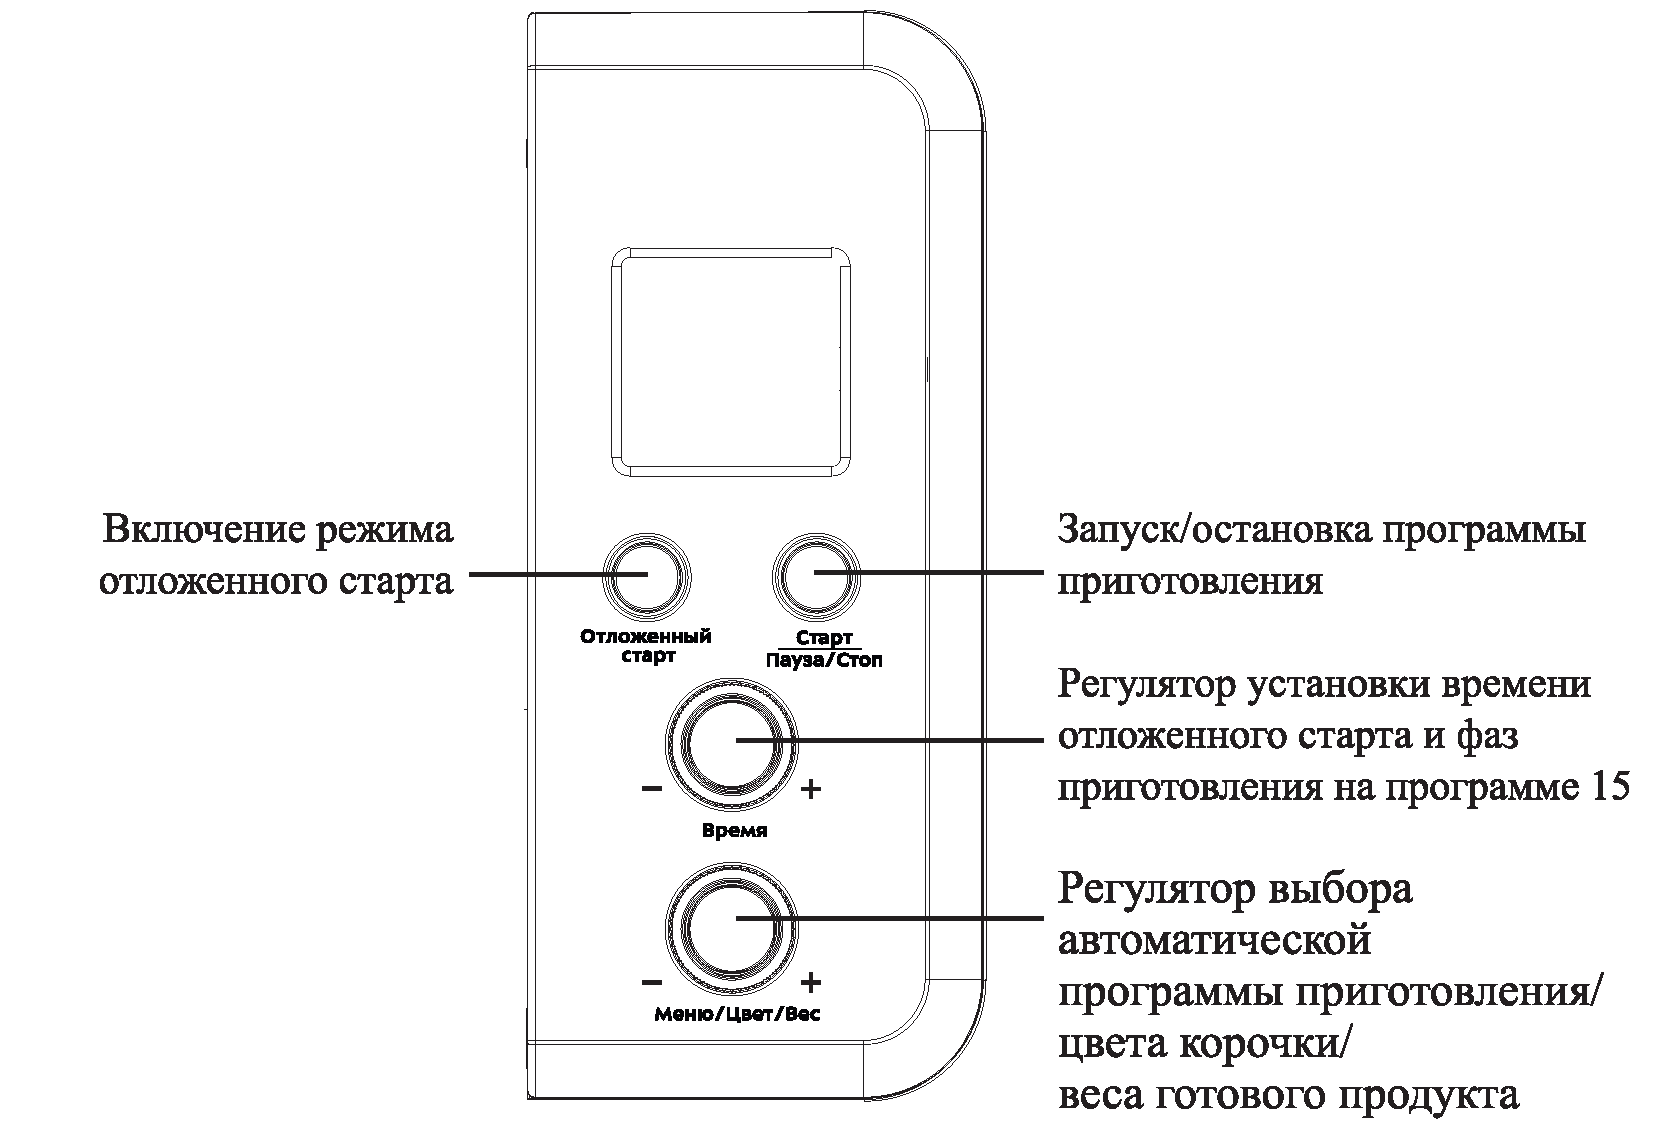
Control panel and display
The control panel contains buttons for turning on the device, knobs for setting cooking parameters, and an LCD display.

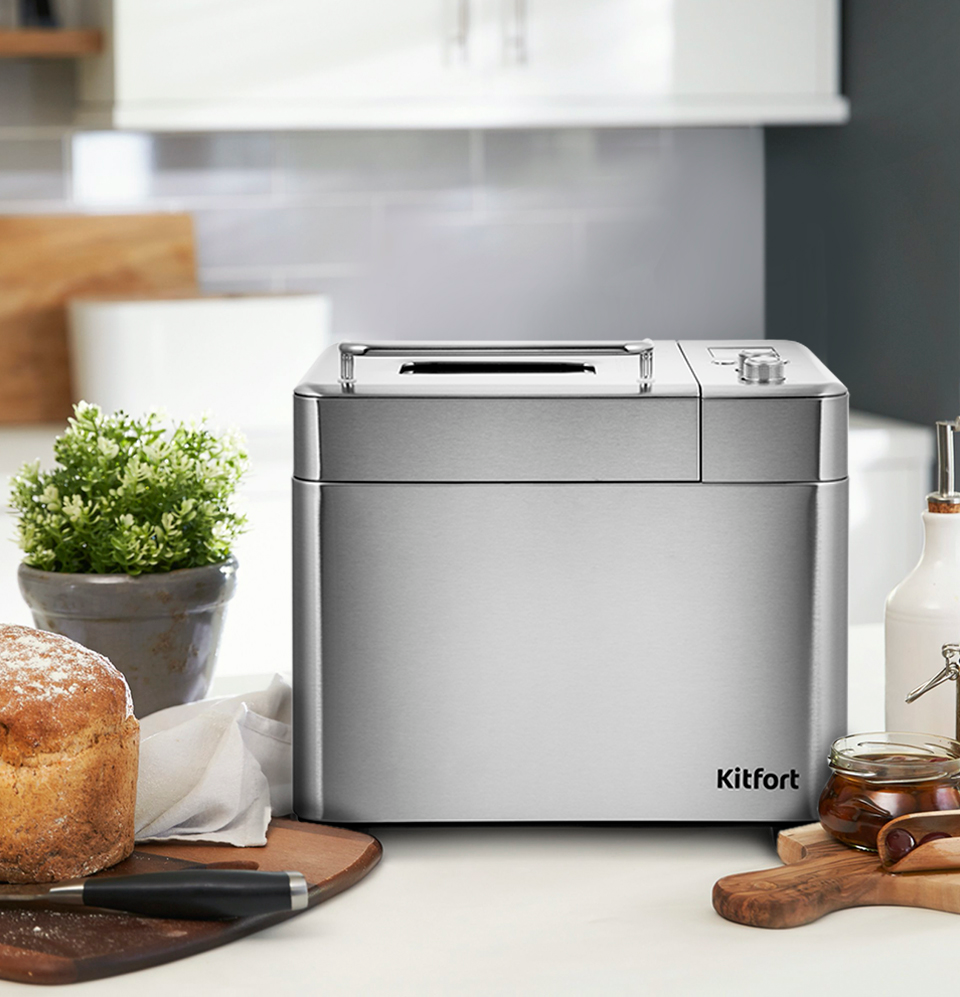
Description of the Kitfort KT-304 bread maker
The KT-304 bread maker allows you to cook various types of bread, jams and desserts, yoghurts, as well as various types of dough. It has a stylish metal body and all the progressive features for a comfortable and enjoyable cooking process.
With 15 automatic programs, you can easily prepare delicious homemade cakes, rye bread, muffins, yoghurt, jam or desserts, knead the dough into pies or pizza. You can start cooking at a later time using the Delayed Start function, or vice versa, using the Quick Bake Program. The bread maker is equipped with the function of choosing the weight of the finished product and the color of the crust in accordance with your taste preferences. An automatic dispenser is installed in the lid for adding additional ingredients to the baked goods during cooking.
The bread maker has a non-volatile memory.If the power supply is cut off while the cooking program is running, the settings are saved in the device memory for 10 minutes. When the power supply is restored, the program will continue automatically. If there is no power supply for more than 10 minutes, the settings are reset, and you will need to start the program again.
The function of keeping the temperature of ready meals keeps baked goods fresh and hot for one hour after the end of the automatic program.
Preparation for work and use
Before first use
Unpack the bread maker and remove all packing material. Wipe the body of the device with a soft dry cloth. Rinse the baking dish and spatula with warm, soapy water and pat dry.
Place the bread maker on a firm, level, horizontal surface away from objects that could be affected by high temperatures. Do not place the breadmaker close to the edge of the table or close to walls.
The first switching on of the Kitfort KT-304 bread maker
Connect the breadmaker to the power supply. A beep sounds and the breadmaker enters standby mode. The display will show the default cooking settings: time 3:10, program 1, weight 750 grams, medium crust.
Place the baking dish in the cooking space, close the cooking space with the lid, start program 14 (see the chapter "Procedure for the baking process") and preheat the bread machine for about 10 minutes. Then let the device cool down and clean all parts again. During the first start-up, a characteristic odor or light smoke from the combustion of technical lubricants may appear. This is not a manufacturing defect.
Using the dispenser
- Open the lid of the bread maker. The dispenser is installed on the inside of the roof
- Open the lid of the dispenser and place inside the nuts, dried fruit, or other ingredients you want to add to the baked goods.
- Close the dispenser cover and place it back on the cover by pushing it down until it locks into place.
- Close the lid of the bread maker and start the baking program. At the right time, the dispenser will automatically add the loaded ingredients to the dough.
Procedure for the cooking process
Attention! Do not use metal spatulas or spoons to avoid damaging the non-stick coating of the baking dish. Use silicone or wood tools that will not scratch.
- Place the stirring paddle on the rod in the baking dish.
- Measure the ingredients according to the recipe and place them in a baking dish. Add liquids, sugar and salt first, then flour. Make a small hole in the flour and add yeast to it. Make sure the yeast does not come into contact with salt or liquids. For convenience, you can place an empty baking dish on a scale and then add the ingredients by measuring the amount in grams.
- If your recipe includes nuts, raisins, or other ingredients during baking, load them into the dispenser.
- Take the pan with the ingredients by the handle, turn it slightly counterclockwise, place it in the heating chamber of the breadmaker and turn it clockwise until it stops. Close the lid of the bread maker.
- Select the desired program by turning the Menu / Color / Weight knob on the control panel, or leave the default settings for classic bread. While selecting a program, the Program Number icon will flash. After selecting a program, press the Menu / Color / Weight knob to confirm.
- After confirming the cooking program number, the crust color selection will be available and the icon of the selected crust color will flash on the display. Turn the Menu / Color / Weight knob until the crust color icon you want flashes on the display. Press the Menu / Color / Weight knob to confirm.
- After confirming the crust color, you can select the weight of the finished product. Turn the Menu / Color / Weight knob until the desired weight icon flashes on the display. Note.For programs 10 and 13, only the crust color selection is available. On programs 8, 9, I and 12, nothing can be changed. In program 14 you can set the cooking time and select the crust color. If you have selected program 15, you can set the time for each cooking phase.
- Press the Start / Stop button to start the program. The cooking time will count down. After starting, all buttons, except Start / Stop, become inactive.
- If you have not loaded food into the dispenser, add them during cooking when you hear 5 beeps (on programs 1-5 and 7).
- To interrupt the execution of the program for a while, press the Start / Stop button. The time will flash on the display. Pressing again will resume. If no action is taken within 3 minutes after pressing the button, the cooking program will continue.
- To completely stop the cooking process, press and hold the Start / Stop button for about 3 seconds. After the beep, the breadmaker will abort the program and return to the default settings.
- After baking is complete, the bread machine will beep 10 times and then turn on keep warm for 1 hour. In keep warm mode, the display will show the time 0:00 and the keep warm icon. Once preheating is complete, the breadmaker will return to standby mode and the display will show the “Ready” icon. To cancel keeping warm, hold down the Start / Stop button for about 3 seconds.
- Unplug the breadmaker.
- Open the lid of the bread maker. Using oven mitts, grasp the bread pan by the handle, turn it counterclockwise and remove it from the heating chamber of the breadmaker.
- Turn the dish upside down and gently shake over a wooden board or dish to remove the loaf.
- Leave the bread to cool for 20 minutes before slicing.
Note. After removing the bread from the mold, the stirring paddle can remain on the shaft in the mold or in the loaf. It depends on the consistency of the finished baked goods. Use a hook to remove the spatula from the bread.
Attention! Do not wiggle the mixing paddle from side to side when removing it from the mold. If the spatula cannot be removed, pour water into the mold for half an hour, and then carefully remove the spatula from the rod.
Delayed start
You can delay the start of the bread maker for a while.
- Select program number, crust color and food weight.
- Click on the Delayed start button.
- Change the cooking time by turning the Time knob. The maximum time when setting the delay start is 14 hours (step 10 minutes). Please note that this is the time until the end of cooking, i.e. delay time + cooking time for the selected program.
- Press Start / Stop to confirm the cooking time and start. Attention! Do not use delayed start if your recipe uses dairy or other perishable foods.
Slicing and storing bread
Use an electric cutter or a special serrated bread knife for slicing.
Store bread in a bread bin, enamel pot with a lid, or in a plastic bag for no more than 3 days. Store sliced bread in an airtight container in the refrigerator for up to 10 days.
Power outage during operation
The bread maker has a non-volatile memory. If the power supply is disconnected during a cooking program, the settings are saved in the device's memory for 10 minutes. When the power supply is restored, the program will continue automatically. If there is no power supply for more than 15 minutes, the settings are reset, and you will need to start the program again. If the dough has already started to rise, you will have to abandon the automatic cooking program and mix the ingredients again.
Description of automatic programs
- Classic bread. Used to bake white bread made from wheat flour.
- French bread.Used to make crispy white bread. Provides long kneading and proofing of the dough.
- Whole wheat bread. Used to make bread with whole grain flour. The program heats up the ingredients before mixing so that the beans absorb the water. It is not recommended to use the delay start function. Grain flour loaves are usually smaller and denser.
- Express. Used for quick preparation of white bread. For the perfect express bread, load the liquid ingredients first and then the dry ingredients into the mold.
- Baking. Recommended for baking sweet breads with various additives such as nuts, raisins, dried fruits, chocolate, coconut. An audible signal will indicate when additional ingredients have been added. Due to the longer lifting phase, the bread will be light and fluffy.
- Sandwich bread. Recommended for baking wheat flour bread with the addition of butter for making sandwiches.
- Rye bread. The program allows you to bake black bread from rye flour. Smaller and denser loaves of black bread. The program is also suitable for making gluten-free breads and baking mixes.
- Mixing. Used for mixing ingredients at high speed. The mixing time can be adjusted depending on the volume and type of ingredients.
- Yogurt. Used for heating milk with sourdough and making natural yoghurt.
- Dessert. Program for kneading and baking foods with a large amount of protein and fat.
- Dough. Used to make wheat flour yeast dough for pies. Program without baking.
- Jam. Program for making preserves, fresh fruit jams and marmalade. Do not allow the mixture to boil while cooking. If this happens, interrupt the program and let the bread maker cool down.
- Cake. Used to make muffins with various additives. The program includes quick kneading, proofing and baking. It is recommended to whisk the eggs and sugar with a whisk before placing them in the pan to help the cake rise.
- Baking. The program is recommended for preparing biscuits, muffins and other products from ready-made dough, as well as for finishing unbaked bread.
- Your settings. With this program you can set the time in each cooking phase - kneading, raising, baking and keeping warm.
Cooking settings in program 15
In the Custom Settings program, you can set the time for each phase. To do this, after you have selected program 15, press the Time knob to select the cooking phase whose duration you want to change. The cooking phases are indicated by icons on the display. After the phase you want is highlighted, turn the Time knob to set the cooking time for that phase. Press the Time knob again to confirm. In this case, you will proceed to setting the duration of the next phase.
In this program, you can also choose the crust color.
Description of ingredients
Water and other liquids (always add first)
Water is an essential ingredient in making bread. Use water at room temperature (20-25 ° C). Some recipes may require milk or other liquids to enhance the flavor of the bread. Never use dairy products with the Delayed Start option.
Egg
Eggs can improve the texture of bread, making it more nutritious and larger in size. Beat the egg with the other liquid ingredients before placing it in the mold.
Butter and vegetable oil
Butter softens the taste of bread and prolongs its shelf life. The butter should be melted or cut into small pieces before adding to the liquid.
Sugar
Sugar is "food" for yeast, and also gives bread a sweet taste and rich ruddy color.
Salt
Salt is essential to improve the taste of bread and the color of the crust.It is also used to restrict yeast activity. Don't use too much salt in the recipe if you want the bread to be fluffier.
Wheat flour
Premium wheat flour is used in most yeast bread recipes. It has a high gluten content, so it can be used to make fluffy, crisp bread.
Grade 1 or 2 flour, without baking powder, is suitable for “quick” bread.
Whole grain flour
Whole grain flour is crushed from the entire wheat kernel and consists of large particles, in its composition bran and grain shell. Bread made from this flour contains more fiber and nutrients. Whole wheat flour is heavier and the finished bread is usually smaller and denser in texture.
Rye flour
Rye flour is a type of flour with a high fiber content and is similar to whole grain flour. For a richer bread, use a combination of rye and wheat flour.
Corn flour
This flour is included in many weight loss diets with limited added sugar in ready meals. It contains a lot of fiber, so it keeps you feeling full and reduces appetite. The addition of cornmeal or oatmeal improves the taste of the bread.
Yeast
Yeast is a living organism and must be kept refrigerated. For fermentation, yeast needs carbohydrates, which are found in sugar and flour. For bread, both baker's yeast and dry and instant yeast are used.
During fermentation, the yeast will produce carbon dioxide. Carbon dioxide will expand the bread and make the inner fiber softer and more porous.
Check the expiration date and storage time of the yeast before use. Store yeast in the refrigerator or the heat will kill the yeast.
Council. To check if your yeast is fresh and active:
• Pour 1 cup (237 ml) warm water (45-50 ° C) into a cup;
• Add 1 teaspoon (5 ml) white sugar to a cup and stir, then 1 tablespoon (15 ml) yeast;
• place a cup of yeast in a warm place for 10 minutes;
• fresh active yeast will begin to bubble or "grow". If it doesn't, the yeast is dead or inactive.
Baking powder
Baking powder is used to make muffins and cakes. It is a mixture of baking soda, citric acid, and flour (starch). The baking powder fills the dough with carbon dioxide and makes the baked goods fluffy.
Baking soda
Baking soda itself is a baking powder. At temperatures above 60 ° C, it emits a little carbon dioxide. Pure baking soda can be added to dough where there are sour foods. For example, sour cream, kefir, yogurt, fruit puree, or juice. If the recipe does not contain acidic ingredients, it is better to extinguish it with vinegar. Undecomposed baking soda gives baked goods a yellow-brown or greenish tint and an unpleasant aftertaste.
Cleaning and maintenance of the bread maker
Clean the bread maker after each use.
Unplug and allow to cool before cleaning and servicing the bread maker.
Wash the baking dish and stirring paddle with hot water and dish soap. If the spatula does not come off, fill the mold with the spatula with water for 1 hour. The mold and spatula are non-stick, so do not use sharp metal objects or aggressive or abrasive detergents or scouring pads for cleaning. Remember that the cover is easily damaged.
Wipe the body, lid and inner surface of the camera with a sponge soaked in warm water and dishwashing detergent. Then remove the remaining detergent and wipe the surfaces dry.
Do not immerse the bread machine in water or wash it under the tap.
The appliance and any of its parts must not be washed in a dishwasher.
Care and storage
Clean and dry the bread maker before storing. Make sure all parts are dry and the lid is closed.
Store your bread maker in a cool and dry place out of the reach of children.
Precautions
Please read the instruction manual carefully.Pay special attention to safety precautions. Always keep the instructions handy.
1. The bread maker is intended for domestic use and can be used in apartments, country houses, hotel rooms, offices and other similar places for non-industrial and non-commercial use.
2. Use your bread maker only for its intended purpose and in accordance with the directions in this manual. Misuse of the device will be considered a violation of the terms of proper use.
3. Before connecting the device to an electrical outlet, make sure that the power ratings indicated on the device match those of the power source being used.
4. To prevent electric shock, do not immerse the device in water or other liquids. Do not wash the bread maker under running water.
5. Do not carry the appliance by the power cord. Do not pull on the power cord when disconnecting the plug from the outlet.
6. Keep the power cord away from hot surfaces.
7. Do not use the device if the power cord, plug, or other parts of the device are damaged. To avoid electric shock, do not disassemble the device yourself - contact a qualified technician to repair it. Remember, improper assembly of the device increases the risk of electric shock during operation.
8. Children, people with reduced physical, sensory or mental capabilities, as well as people who do not have sufficient knowledge and experience, are allowed to use the bread maker only under the supervision of persons responsible for their safety, or after instructions on how to use the device. Don't let children play with the bread maker.
9. Supervise the operation of the device when children and pets are nearby.
10. Do not leave the working device unattended. Turn it off and unplug it after use, if not using the device for a long time or before performing maintenance.
11. Do not turn on the bakery without a baking dish installed.
12. Do not touch hot surfaces of the bread maker while cooking. Do not put your hands inside the heating chamber after removing the bread.
13. The body of the device may become hot during operation.
14. The baking dish and stirrer module get very hot during baking. Be careful! Possible risk of burns. Use potholders.
15. Place the Bread Maker only on a stable, horizontal surface, at least 10 cm from the wall and edge of the table and away from flammable objects.
16. Do not block the ventilation openings while the bread maker is in operation.
17. If dark smoke comes out of the bread maker, turn off the appliance immediately.
18. Do not drop the bread maker or subject it to impact.
19. Keep the device out of the reach of children.
20. Use only accessories offered by the manufacturer. The use of other optional accessories may result in damage to the device or injury.
Kitfort KT-304 Bread Maker Video
")