|
Mcooker: best recipes About bread
|
|
With our instructions, you will be able to bake the perfect loaf in your bread maker the very first time. The tips are general, should work for all bread makers, and should be applied in conjunction with the instructions for your bread machine. Use fresh, quality ingredients as you cannot expect good results from expired flour or yeast.
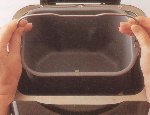 1. Place the bread maker on a flat, fireproof surface. Make sure it is away from heat sources such as a stove or sunlight, and not in a draft, as all of these factors affect the temperature inside the bread machine. Do not plug in the bread maker at this point. Open the cover. Reach the mold by the handle, turning slightly to the side or pulling upward, depending on your machine model. 1. Place the bread maker on a flat, fireproof surface. Make sure it is away from heat sources such as a stove or sunlight, and not in a draft, as all of these factors affect the temperature inside the bread machine. Do not plug in the bread maker at this point. Open the cover. Reach the mold by the handle, turning slightly to the side or pulling upward, depending on your machine model.
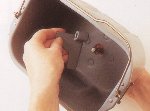 2. Make sure that no bread crumbs from previous baking are stuck in the kneading paddle. Slide the paddle onto the shaft at the bottom of the mold. The blade can only be worn in one position, since the rod and the part of the blade that is worn on it are made in the shape of the letter D. 2. Make sure that no bread crumbs from previous baking are stuck in the kneading paddle. Slide the paddle onto the shaft at the bottom of the mold. The blade can only be worn in one position, since the rod and the part of the blade that is worn on it are made in the shape of the letter D.
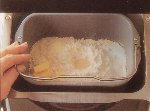
 3. Pour in water, milk and / or other liquids, unless the instructions for your bread maker say to add the dry ingredients first. If so, change the order in which the ingredients are loaded into the bread maker, starting with yeast. 3. Pour in water, milk and / or other liquids, unless the instructions for your bread maker say to add the dry ingredients first. If so, change the order in which the ingredients are loaded into the bread maker, starting with yeast.
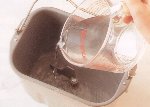
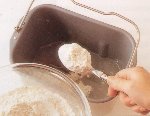 4. Pour flour so that it completely covers the liquid, add all dry ingredients specified in the recipe, for example, milk powder. Place the salt, sugar and butter in different corners of the mold so that they do not touch each other. 4. Pour flour so that it completely covers the liquid, add all dry ingredients specified in the recipe, for example, milk powder. Place the salt, sugar and butter in different corners of the mold so that they do not touch each other.
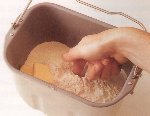 5. Make a small well in the middle of the flour so that it does not reach the liquid and add yeast to it. If your well has reached the liquid, the yeast will get wet and start working quickly. 5. Make a small well in the middle of the flour so that it does not reach the liquid and add yeast to it. If your well has reached the liquid, the yeast will get wet and start working quickly.
 6. Place the dish in the bread maker, securing it tightly in place. Depending on the model, the bread maker may have special fasteners that secure the mold in the bread maker, or the mold must be screwed slightly into the bottom of the bread machine. Lower the handle and close the lid. Then plug the bread maker into a power outlet. 6. Place the dish in the bread maker, securing it tightly in place. Depending on the model, the bread maker may have special fasteners that secure the mold in the bread maker, or the mold must be screwed slightly into the bottom of the bread machine. Lower the handle and close the lid. Then plug the bread maker into a power outlet.
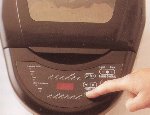 7. Select program, crust color and loaf size, if possible. Press the "Start" button. The kneading process will begin immediately, unless your machine has a special “rest” period to set the temperature and you have not programmed the bread maker to bake the bread by morning. 7. Select program, crust color and loaf size, if possible. Press the "Start" button. The kneading process will begin immediately, unless your machine has a special “rest” period to set the temperature and you have not programmed the bread maker to bake the bread by morning.
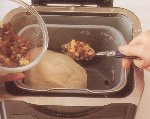 8. When the dough is kneaded, the bread maker will emit a few beeps and you can add additional ingredients such as dried fruit if you like. Open the lid, add food and close the lid. 8. When the dough is kneaded, the bread maker will emit a few beeps and you can add additional ingredients such as dried fruit if you like. Open the lid, add food and close the lid.
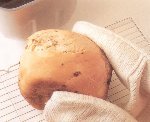
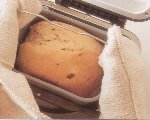 9. At the end of the cycle, the bread maker will beep a few more beeps to indicate that the dough or bread is ready (depending on the program). Click the Stop button. Open the cover. When you get bread, be sure to wear oven mitts to avoid scalding yourself. Do not bend over or cloud over the open bread maker, as hot air can escape from there, which can also burn yourself. 9. At the end of the cycle, the bread maker will beep a few more beeps to indicate that the dough or bread is ready (depending on the program). Click the Stop button. Open the cover. When you get bread, be sure to wear oven mitts to avoid scalding yourself. Do not bend over or cloud over the open bread maker, as hot air can escape from there, which can also burn yourself.
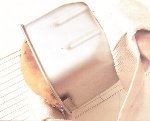 10. Still in the gloves, turn the mold upside down and shake it several times. If not useful, tap the bottom against a wooden board. 10. Still in the gloves, turn the mold upside down and shake it several times. If not useful, tap the bottom against a wooden board.
 11. If the kneading paddle is stuck in the bread, use a wooden spatula or other fireproof tool to remove it, for example. It will come out easily. 11. If the kneading paddle is stuck in the bread, use a wooden spatula or other fireproof tool to remove it, for example. It will come out easily.
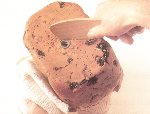
12. Put the bread on the wire rack and let cool. Unplug the bread maker and allow to cool before using again. A machine that is too hot will not bake a normal loaf, and many will not turn on if they are too hot. Rinse the mold and kneading paddle and wipe the bread maker. All parts of the bread maker should be cold and dry when you put them inside. |
|