Supra BMS-191. Bread Maker Specifications |
|
General characteristics
Programs
Additional Information
Dimensions and weight
SAFETY INSTRUCTIONS When developing and manufacturing our products, we strive to make safe using them. In addition, we ask you to observe the usual safety precautions when working with electrical appliances and to observe the following precautions: Before using this appliance for the first time, please read this instruction manual carefully and retain it for future reference. Make sure that the mains voltage and power outlet correspond to the value indicated on the appliance. If the outlet of the power source is incompatible with the plug of the device, make the necessary replacement of the outlet using the assistance of qualified specialists. The electrical safety of the instrument is only guaranteed if it is connected to an adequate earthing source, in accordance with current electrical safety regulations. If in doubt, consult a qualified technician. It is not recommended to use adapters, tees and / or extension cords to connect the device. If necessary, use only adapters and extension cords that comply with current safety regulations and are rated for the appropriate power. In this case, you must ensure that the power limit indicated on the adapter is not exceeded. It is forbidden to operate the bread maker under the control of external timers or other remote control systems that regulate the on / off of the device. Packaging components (plastic bags, polystyrene foam, etc.) should be kept out of the reach of children as they are potential sources of danger. This appliance should only be used for domestic use. Any other use is considered inappropriate or dangerous. The manufacturer is not responsible for damage caused by improper, erroneous or inappropriate use of the device, as well as for repairs carried out by unqualified personnel. Do not touch the appliance with wet or damp hands or feet. To avoid electric shock, keep the device away from water or other liquids. Do not plug in the appliance if it is installed on a damp surface. Place the device on a horizontal, dry, hard and stable surface. Do not use the appliance near heat sources such as a stove. Do not allow children to use the appliance unattended. This device is not intended for use by persons with reduced mobility or mental capabilities (including children under 8 years of age), or by persons lacking the appropriate knowledge and experience. The device may only be used under the supervision or guidance of a person responsible for its safe use. Children are prohibited from playing with the device. To increase the safety of using the device, it is recommended to install a residual current device (RCD) in the power supply circuit for a current not exceeding 30 mA. Take advantage of the advice of a qualified professional. Do not leave the switched on bread maker unattended as it can become a source of danger. Do not bend or pinch the cord and be careful not to walk on it. When unplugging the power plug, never pull on the power cord, but grasp the power plug. Unplug the appliance before starting any cleaning and maintenance operations. If the device breaks down or does not work properly, stop using it, turn it off and do not try to repair it yourself. In case of need for repairs, contact only a service center certified by the manufacturer. If the power cord of this product is damaged, contact an authorized service center to have it replaced. Do not use or place any part of this appliance on hot surfaces (gas or electric hobs or stoves). Do not use chemically active or abrasive cleaning agents. Do not touch hot surfaces of the device. Use potholders or mittens. Do not touch the moving parts of the bread maker during operation. It is not recommended to turn on the bread oven unnecessarily if a baking dish with ingredients is not installed in it. Allow the bread maker to cool before cleaning. Do not immerse the breadmaker, power cord or plug in water or other liquid or spray it with water. Always remove the baking dish from the oven chamber to add ingredients. Do not store anything in the oven chamber. Do not block the steam vents and provide adequate ventilation for the stove during operation. Position the oven so that there is a gap of at least 5 cm between the body and the walls. BAKERY DEVICE NOTE: All images in this manual are examples, actual product may differ from images. 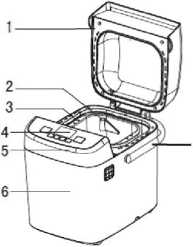
Yu
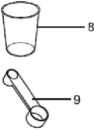
1 - Cover with a viewing window 2-Paddle 3 - Baking dish 4-Display 5 - Control panel 6 - Furnace body 7 - The hook for removing the scapula 8 - Measuring glass 9 - Measuring spoon (large (table) - 15 ml and small (teaspoon) - 5 ml) CONTROL PANEL 1 2 3 4 1 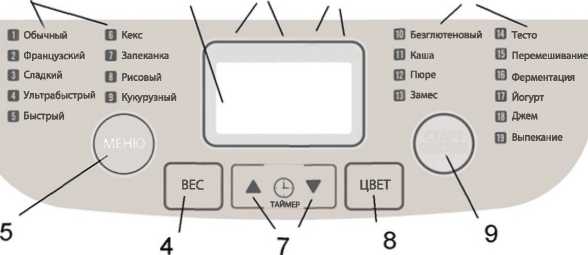
1 - Index of the names of the cooking programs 2 - Display - indicator of the selected program, display of the operating time and the timer for the delayed start of cooking. 3 - Index of the selected crust color 4 - Index of the selected bread weight 5 - MENU button - selection of a cooking program 6 - WEIGHT button - selection of bread weight 7 - Buttons TIMER A and V - timer selection 8 - COLOR button - selection of the color of the crust of bread 9- START / PAUSE / STOP button - turn on / pause / turn off the cooking mode. Place the appliance in the designated place. Do not place a baking dish inside. Close the lid of the bread maker. Plug the power cord into an electrical outlet, making sure that the plug and outlet are securely connected. Turn on the mode for 10 minutes Baking. When the bread maker is first heated, odor and a small amount of smoke may form due to burning of the transport grease and coating of the heater surface. Let the bread maker cool for 30 minutes. Once it has cooled down, clean again as described in the appropriate section of this manual. Dry all parts thoroughly. The bread maker is now ready for use. USING THE APPLIANCE Preparation for use After removing the device from its packaging, check that it is in perfect condition. If there is any damage to the device or accessories, contact the service center. Remove all packing materials and all stickers from the surface and interior of the instrument except the model name and serial number. Clean all food contact parts of the appliance as described in the appropriate section of this manual.
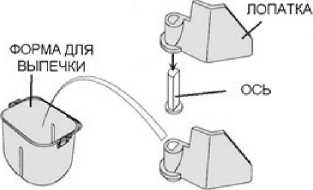
Turning on the devicePlace the spatula on the spindle in the center of the baking dish.
Place food in a clean baking dish, then place the baking dish in the body of the bread machine.
Make sure that the mold fits without distortion and that the rotation of the kneading paddle is engaged. Close the cover firmly. Plug the power cord into an electrical outlet. Make sure the plug and socket are making contact. The oven is now in standby mode and the display shows 1 - default mode, Usual bread and the time 3:00 required to complete it. Selecting a cooking programButton MENU serves to select a program. Each press of the button changes the program. You can install one of 19 programs. In this case, the display will show the number of the selected program and the time required for its execution. The features of each of the programs are described below. 1. Usual: kneading, lifting and baking regular bread. At a certain time, 10 beeps will sound, and you can add additional ingredients to the dough, according to your personal preferences. 2. French: kneading, lifting and baking bread. In this mode, the dough takes longer to rise. The bread is crispy and light in texture. Do not use this program to bake bread containing butter, margarine or milk. At a certain time, 10 beeps will sound, and you can add additional ingredients to the dough, according to your personal preferences. 3. Sweet: kneading, lifting and baking bread with a high sugar content or the addition of fruit juices, raisins, chocolate, etc. At a certain time, 10 beeps will sound, and you can add additional ingredients to the dough, according to your personal preferences. 4. Ultrafast: kneading, lifting and baking bread in the shortest possible time. The finished bread is comparatively less fluffy. It is recommended to use special flour mixes for ultra-fast cooking. 5. Quick: kneading, raising and baking bread in less time than in the main program, but longer than in the Ultrafast program. Bread made with this program is usually smaller and denser in texture than the Normal program. At a certain time, 10 beeps will sound, and you can add additional ingredients to the dough, according to your personal preferences. 6. Cake: kneading, lifting and baking bread with baking soda or baking powder. 7. Casserole: kneading and baking dishes with a high percentage of fat and protein in the recipe. 8. Rice: kneading, lifting and baking bread with the addition of rice flour or boiled rice. At a certain time, 10 beeps will sound, and you can add additional ingredients to the dough, according to your personal preferences. 9. Corn: kneading, lifting and baking bread with the addition of corn flour. At a certain time, 10 beeps will sound, and you can add additional ingredients to the dough, according to your personal preferences. 10. Gluten Free: kneading, lifting and baking bread from flour or special mixtures with a reduced gluten (gluten) content. The dough from such mixtures requires more time for fermentation and other baking modes. At a certain time, 10 beeps will sound, and you can add additional ingredients to the dough, according to your personal preferences. 11. Porridge: kneading and stewing various dishes with the consistency of porridge. 12. Puree: simmering and kneading various dishes with a puree consistency. 13. Kneading: kneading dough or stirring other non-solid foods 14. Dough: kneading and raising the yeast dough, without further baking. 15. Mixing: brief mixing of non-solid foods 16. Fermentation: exposure for 48 hours at a temperature of 32 ° C. Time adjustment is possible within the range from 24 to 72 hours. 17. Yogurt: exposure for 8 hours at a temperature of 38 ° C. The time can be adjusted from 0 to 12 hours in 5 minute increments. 18. Jam: making preserves and jams consists of heating, then heating with stirring. 19. Baking: only baked goods without pre-kneading and raising the dough. Also used for baking in other programs. Then, by pressing the button START / PAUSE / STOP enable the execution of the specified program. You will hear a short beep and the program will start. In this case, the colon between the time digits on the display will start flashing After the program has started, all other buttons, except for the START / PAUSE / STOP, become inactive. This feature helps to prevent unintentional changes to the program while it is running. If necessary, temporarily interrupt the operation of the bread machine - press the button START / PAUSE / STOP - the device will go into pause mode. To continue work - press the button START / PAUSE / STOP. Note: Even if you do not do this, the program will continue automatically after about 2 minutes. If necessary, stop the operation of the bread machine - press and hold the button for 3 seconds START / PAUSE / STOP - the device goes into standby mode. During the execution of some programs (see the description of the programs) the bread-maker will sound 10 beeps some time after the start of work. This is a signal that you can (need) add ingredients (nuts, fruits, etc.) in accordance with the recipe. Open the oven lid and add the required ingredients. After a few seconds, the oven will continue to operate. Other oven settingsAfter selecting the desired program and, if necessary, select the desired weight by pressing the button WEIGHT. Note: this setting is not available in modes 4,6,7,11-19. Then, if necessary, select the desired degree of roasting of the bread by pressing the button COLOUR. Note: this setting is not available in modes 4,6,7,11-19. Then, if necessary, set the delayed start time by pressing TIMER A and V. Note: Timer setting is not possible in mode 18. Timer, delayed cookingUsing the TIMER A and V buttons you can set the time after which the bread will be ready. The timer time set must include the running time of the selected program. The maximum possible time for setting is 15 hours. First select the program, bread weight and crust color, and then use the TIMER buttons A and Have set the time you want. Each press of the TIMER +/- button increases or decreases the timer time by 5-10 minutes. Example: It is now 20:30, and you need to have regular bread ready in the morning by 7:00, i.e. after 10 hours and 30 minutes. Place the ingredients in a baking dish. Place the mold in the oven. Install the menu program - Normal. The display will show the time required for this program, "3:00". Then, pressing the TIMER A and Y buttons, set the timer time “10:30” (the closest to the required “10:30” value). Then press the button START / PAUSE / STOP, to activate the timer. The colon flashes on the display and the timer counts down. In the morning at 7 o'clock there will be ready-made hot bread in the oven. If you do not take it out immediately, the keep warm function is automatically activated for 1 hour. NOTES: The timer function is not available for some programs (see program descriptions). Do not use the timer function if your bread contains perishable foods such as eggs, fresh milk, fruits, onions, etc. Keep warm functionThe prepared bread will be automatically kept warm for 60 minutes after baking. This function is not available in all modes (see program description). At the end of the program and the end of the keep warm mode, 10 beeps will sound. Ready baked goodsIf you want to take out the bread before the keep warm function ends, first turn off the heating by pressing the button START / PAUSE / STOP, and then take out the bread. Non-volatile memoryIn case of brief power outages during the preparation of bread, the baking process will automatically continue after the power supply is restored, even without pressing the button START / PAUSE / STOP, if the power has been disconnected for no more than 15 minutes. If a power outage lasts more than 15 minutes, the settings are not saved and the oven program must be restarted. If cooking has not gone beyond the first kneading stage, when the power outage occurred, you can press the button START / PAUSE / STOP, to start the program from the beginning - that is, you do not need to change the cooking ingredients. TIPS FOR USING THE OVEN Forming ingredients 1. Place the baking dish on a horizontal surface. Lock the kneading paddle to the paddle shaft. Before installing the spatula, it is recommended to lubricate the spatula and the shaft with oil to avoid sticking of the dough, and also to facilitate the removal of bread from the spatula. 2. Place the ingredients in a baking dish. Follow the order of the recipe. Typically, water or other liquid ingredients are poured in first, then flour, sugar and salt are added, and yeast or baking powder is added last. Yeast or soda Dry ingredients --Water or liquid 3. Make a small hole in the flour and put the yeast in it, make sure that the yeast does not come into contact with liquid or salt. Removing the finished productOpen the lid, then, using oven mitts, grasp the handle of the baking dish firmly, gently pull the baking dish straight up and out of the oven. ATTENTION:The baking dish and the bread itself can be very hot! Be careful with them! Let the baking dish cool before removing the bread. Then use a non-stick spatula to gently separate the edges of the bread from the sides of the pan. Turn the baking dish upside down over a clean kitchen wire rack or board and shake gently until the bread falls onto the wire rack or board.
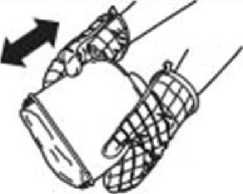
Remove the bread carefully from the mold and let it cool for about 20 minutes before slicing. If you left the room or did not press the button START / PAUSE / STOP at the end of the program, the bread will be kept warm for 1 hour and then the power will turn off. To deactivate the keep warm function and remove the bread, press the button START / PAUSE / STOP. When you are not using or finished using the bread maker, unplug the power cord from the wall outlet. ATTENTION:Before slicing the bread, use the hook from the oven kit to hook and remove the kneading spatula hidden on the underside of the loaf. The bread can be very hot, never remove the kneading paddles by hand. Indoor temperatureThe machine can operate at different temperatures, but the quality of bread baked at very high or very low ambient temperatures will differ. The optimum room temperature is from 15 ° C to 34 ° C. Display warningsIf, after turning on the oven or starting the program, if the message "ННН", "ЕЕО", etc. "appears on the display, this means that the oven automation has detected a malfunction and the program has been stopped. In this case, you should try to eliminate the malfunction, guided by the recommendations from the table POSSIBLE FAULTS AND REMEDY. If you are unable to rectify the problem yourself, contact the manufacturer's authorized service center. INGREDIENTS FOR BAKING BREAD 1. Bread flourBread flour has a high gluten content (it can also be called a high gluten flour, which is rich in protein). This flour has good elasticity and allows the bread to retain its volume after being raised. Only special bread flour can be used to make bread with a larger volume and better internal structure. Bread flour is the main ingredient for making bread. 2. Plain flourFlour that does not contain baking powder is suitable for making quick bread. 3. Whole grain flourWhole grain flour is made from unrefined grains. It contains wheat husk and gluten. Whole wheat flour is heavier and more nutritious than regular flour. Bread made with whole grain flour is usually small in size. Many recipes suggest mixing whole grain and bread flour for best results. 4. Dark wheat flourDark wheat flour, or so-called "wholemeal flour", is a flour with a high content of dietary fiber and similar in properties to whole grain flour. To obtain a large volume after rising the dough, this flour must be used with the addition of a proportion of bread flour. 5. Self-rising ("pancake") flourThis type of flour contains baking powder, it is specially designed for making shortbread dough. 6. Corn, rice and oat flourCornmeal and oatmeal are made from corn, rice, and oats. These are additional ingredients for making rough bread and are used to enhance flavor and texture. /Sugar Sugar is a very important ingredient in making breads sweet and colored. Sugar is considered a nutrient in yeast bread. White sugar is widely used. Brown sugar, powdered sugar or cotton sugar are added according to special requirements. 8. YeastDuring fermentation, yeast releases carbon dioxide. Carbon dioxide increases the volume of the bread and makes the inner structure softer. Also, the fermentation process of yeast requires the hydrocarbon contained in sugar and flour as a nutrient. Keep the yeast refrigerated as yeast can die at high temperatures. Check the manufacturing date and shelf life of your yeast before use. Put them back in the refrigerator as soon as possible after each use. Usually, if the dough does not rise, it is caused by poor yeast. The following steps will help you know if your yeast is fresh and active or not: 1) Fill the measuring cup halfway with warm water (45-50 ° C). 2) Put a teaspoon of sugar in a glass and stir, then add a teaspoon of yeast on top. 3) Place the measuring cup in a warm place for about 10 minutes. Do not stir the water. 4) The foam should rise to a full glass. Otherwise, the yeast is dead or inactive. 9. SaltSalt is needed to improve the flavor of the bread and the crispiness. But salt can also interfere with the rise of yeast. Never use more salt than the recipe says. The bread will be larger if you don't add salt. 10. Eggs Eggs can improve the texture of the bread, make the bread more nutritious and bulky, the eggs should be broken and mixed into a homogeneous mass. 11. Ghee, butter and vegetable oilGhee can soften bread and prolong its shelf life. The butter must be melted or cut into small pieces before use. 12. Baking powderBaking powder is used for lifting quick breads and cakes. Baking powder does not take time to rise the dough, they can also produce air, air forms bubbles, which softens the texture of the bread in a similar way to yeast. 13. Soda Soda is similar in properties to baking powder. It can also be used in combination with leavening agents. 14. Water and other liquid ingredientsWater is the main ingredient in making bread. It is best to use water with a temperature between 20 ° C and 25 ° C.The water can be replaced with fresh milk or water with 2% milk powder, which will improve the flavor of the bread and the color of the crispy crust. Some recipes involve adding juice to add flavor to the bread, such as orange, lemon, etc. SYSTEM OF MEASURES OF INGREDIENTS One of the important conditions for making good bread is the correct dosage of the ingredients. It is highly recommended to use a measuring cup and measuring spoon to measure the exact amount, otherwise the quality of the bread will be affected. 1. Dosage of liquid ingredients Water, fresh milk or diluted milk powder should be measured with a measuring cup. Observe the level of the measuring glass in a horizontal position. After measuring vegetable oil or other similar ingredients, rinse the measuring cup thoroughly. 2. Dosage of dry ingredients The dry ingredients need to be measured by carefully pouring them into a measuring cup, and then when it is full, you need to level them with a knife. It is not necessary to pour the glass from the top or to condense its contents, otherwise the excess of the ingredient can disturb the proportions of the recipe. When measuring small quantities of dry ingredients, use a measuring spoon. The level of the ingredients in the spoon should also be level and without a hill, because an excess of an ingredient can disrupt the proportions of the recipe. 3. The sequence of adding ingredients The sequence of adding the ingredients must be observed: first, put the liquid ingredients, eggs, salt, milk powder, etc. The flour must not be completely saturated with liquid before cooking. Yeast should only be put on dry flour. In addition, the yeast should not come into contact with the salt. Some time after the start of kneading the dough when baking according to some programs, you will hear a beep, which means that it is time for you to add ingredients (fruits, nuts, etc.) to the mixture. If you add the fruit ingredients too early, they may lose their appearance and taste after long mixing. When using the timer function for a long baking delay, never add perishable ingredients such as eggs and fruit ingredients. PROGRAM TABLE 1-0 Plain, 2 French, 3-Sweet, 4-Ultra Fast, 5 Quick, 6-Cupcake, 7-Casserole, 8-Rice, 9-Corn,
10-Gluten-free, 11-Porridge, 12-Puree, 13-Kneading, 14-Dough, 15-Stirring, 16-Fermentation, 17-Yo-Hert, 18-Jam,
Note: the table shows the execution time of the program steps for a product weight of 600g. Lead times may vary slightly for different weights. CLEANING AND CARE The appliance should be cleaned immediately after each preparation in it. Unplug the oven from the mains and let it cool down before cleaning. 1. Baking dish: Wipe inside and out with a damp cloth. Do not use sharp objects or abrasive products to avoid damaging the non-stick coating.Dry the baking pan completely before placing it in the bread maker. The non-stick coating may change color slightly over time. Don't worry as this is due to interaction with steam and will not affect the operation of the appliance. 2. Kneading spatula: if the spatula is difficult to remove from the axle, fill the mold with warm water and let it soak for about 30 minutes. Then it can be easily removed for cleaning. The spatula should also be wiped gently with a dry cotton cloth. The baking dish and spatula can be washed with dishwashing detergents. 3. Cover: Wipe the inside and outside of the cover with a slightly damp cloth. 4. Case: Gently wipe the outside of the case with a damp cloth. Do not use abrasive products to clean the housing, as they can damage its surface. Never immerse the oven body in water. 5. Before storing the breadmaker, make sure it is completely cool, clean and dry and that the oven lid is closed. SAFE DISPOSAL Your device is designed and is made with high quality materials and components that can be recycled and reused. If a product has the crossed out wheeled bin symbol, it means that the product complies with European Directive 2002/96 / EC. Check your local separate collection system for electrical and electronic products. Observe local regulations. Dispose of old devices separately from household waste. The correct disposal of your product will help prevent potential negative consequences for the environment and human health. |

| Supra BMS-159, Bread Maker Specifications | Supra BMS-151. Bread Maker Specifications |
|---|
New recipes